Tag: Scalloped Tag Topper Punch

Stampin’ Up! Scalloped Tag Topper Box! Want One?

Stampin’ Up! Scalloped Tag Topper Box! Want One?

Hey there! I've been at Alisa's all day, sewing. I can't tell you yet what we are working on, but I love to dabble in other crafts. It gives me "fresh eyes" for stamping! (Don't worry, you WILL see the finished sewing results one of these days!)

Today I have the treat-holder I made for a convention swap using a tutorial by Canadian demo Martha Inchley. I contacted Martha for her permission to use her tutorial for my swap. A link to Martha's tutorial is HERE.

Stampin_up_scalloped_tag_topper_box_1

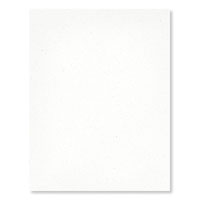
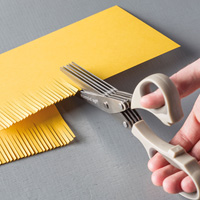
I used Flashback Designer Paper for the sides. Flashback is my FAVORITE DSP right now. (That may change when my pre-order from the Holiday Catalog arrives tomorrow, yay!)

Basic Black Baker's Twine to keeps the box top together attaches the tag:

Stampin_up_scalloped_tag_topper_box

Would you like one of these? Contact me to book a party in August, September, or October! This is just ONE of the gifts you will receive from me and Stampin' Up! when you have a stampin' party or catalog party!

Live too far away? Contact me to book a catalog party and you will receive the SAME gifts from me just as if we were face-to-face! I will provide you with a Hostess Code so your friends can place their orders, which will ship direct to them. As soon as the party closes I will ship my gifts to you!

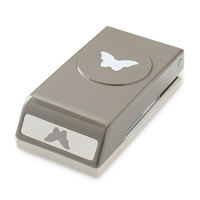
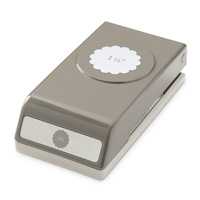
Want to make your own little boxes? These would make cute wedding, shower, or party favors, wouldn't they? Here's your supply list for my Online Store:

All images ©Stampin'Up!™1990-2014

Stampin’Up! Blended Bloom Scalloped Tag Topper Screen Card!

Stampin’Up! Blended Bloom Scalloped Tag Topper Screen Card!

Hey there! I've been working on the projects for my Punch & Technique Class this weekend. I received a "Screen Card" in my monthly swap from Kelly Acheson, so I adapted it for the "punch" project in my class:

Stampin_up_blended_bloom_1

I added a scallop at the top of each screen section with the Scalloped Tag Topper Punch. It gives it a "victorian wardrobe" look, don't you think?

Here are the sections up close:

Stampin_up_blended_bloom_2

I used the same stamps that Kelly did, but I changed the color palette, partly because I had a full pack of Old Olive 12×12 cardstock on hand, but mostly because I seem to be on a big Blackberry Bliss kick right now!

Stampin_up_blended_bloom_3

Really Good Greeting, Yippee-Skippee, and Label Love, stamped in Memento Tuxedo Black ink, show up nicely on the Blended Bloom background.

Stampin_up_blended_bloom_4

A few touches of rhinestones here and there:

Stampin_up_blended_bloom_5

I added a 5th layer to the back of the 4th screen to have an area for signature.

Stampin_up_blended_bloom_screen

Here's your supply list for your order in my Online Store:

That's all for now! Come back tomorrow to see the technique we will be doing at class this weekend! Until then, have a Stampingrox! day!

All images ©Stampin'Up!™1990-2014

Stampin’Up! Scalloped Tag Topper Bunny Box!

Stampin’Up! Scalloped Tag Topper Bunny Box!

Hey there! I've had a fun day today, creating and CASEing some new projects! The first one I want to show you is another project you can choose to make at my Happiest Day Class this Friday. I was inspired by Michelle Last of the UK to make these bunny boxes:

Stampin_up_scalloped_tag_topper_box_1

I made a few minor changes, but the basic construction is all Michelle's. You can view her video and instructions HERE. I hope after you view her instructions you will be inspired to come back and purchase your Stampin' Up! supplies from me in my online store. (USA residents cannot purchase from UK demos and vice-versa)

Stampin_up_scalloped_tag_topper_box_2 - Copy

I added little "bunny tails" to mine with hearts punched from Blushing Bride Patterns Designer Paper and the Small Heart Punch.

Stampin_up_scalloped_tag_topper_box_6 - Copy

The box opens and can hold several pieces of chocolate! (is there any other kind of candy?)

Stampin_up_scalloped_tag_topper_box_3 - Copy

I added an easter-egg basket to the Early Espresso bunny with the Large and Extra-Large Oval punches, the circle punch from the Itty Bitty Shapes Punch Pack for the "eggs", and the Square Lattice Textured Impressions Folder for the baskets' "weave".

Stampin_up_scalloped_tag_topper_box_4 - Copy

When you watch Michelle's video, she will give you some tips for cutting the flower stems with the Fringe Scissors! You tie the twine around the stems before you make the final cut from the cardstock, an ingenius way to keep the stems together as you tie the bow!

Stampin_up_scalloped_tag_topper_box_5 - Copy

I stamped and cut out this bunny's egg with the Backyard Basics Bundle of stamp set and Big Shot framelits.

That's all for now. I hope you are now inspired (and instructed) by Michelle's video to make your own bunny boxes! If you have any questions, you can just leave me a comment or email me: carol@carolpaynestamps.com

Until tomorrow, have a Stampingrox! day!

Here's the supply list to make the bunny boxes:


©Stampin'Up!™1990-2014

Stampin’Up! Scalloped Tag Topper Bunny Box!

Stampin’Up! Scalloped Tag Topper Bunny Box!

Hey there! I've had a fun day today, creating and CASEing some new projects! The first one I want to show you is another project you can choose to make at my Happiest Day Class this Friday. I was inspired by Michelle Last of the UK to make these bunny boxes:

Stampin_up_scalloped_tag_topper_box_1

I made a few minor changes, but the basic construction is all Michelle's. You can view her video and instructions HERE. I hope after you view her instructions you will be inspired to come back and purchase your Stampin' Up! supplies from me in my online store. (USA residents cannot purchase from UK demos and vice-versa)

Stampin_up_scalloped_tag_topper_box_2 - Copy

I added little "bunny tails" to mine with hearts punched from Blushing Bride Patterns Designer Paper and the Small Heart Punch.

Stampin_up_scalloped_tag_topper_box_6 - Copy

The box opens and can hold several pieces of chocolate! (is there any other kind of candy?)

Stampin_up_scalloped_tag_topper_box_3 - Copy

I added an easter-egg basket to the Early Espresso bunny with the Large and Extra-Large Oval punches, the circle punch from the Itty Bitty Shapes Punch Pack for the "eggs", and the Square Lattice Textured Impressions Folder for the baskets' "weave".

Stampin_up_scalloped_tag_topper_box_4 - Copy

When you watch Michelle's video, she will give you some tips for cutting the flower stems with the Fringe Scissors! You tie the twine around the stems before you make the final cut from the cardstock, an ingenius way to keep the stems together as you tie the bow!

Stampin_up_scalloped_tag_topper_box_5 - Copy

I stamped and cut out this bunny's egg with the Backyard Basics Bundle of stamp set and Big Shot framelits.

That's all for now. I hope you are now inspired (and instructed) by Michelle's video to make your own bunny boxes! If you have any questions, you can just leave me a comment or email me: carol@carolpaynestamps.com

Until tomorrow, have a Stampingrox! day!

Here's the supply list to make the bunny boxes:


©Stampin'Up!™1990-2014

Stampin’Up! Scalloped Tag Topper Easter Treats!

Stampin’Up! Scalloped Tag Topper Easter Treats!

Hey there! I'm back again! yay! I didn't get any time to stamp today, but that's o.k. All of my kids and grandkids were here off and on all day, so it was a fun day!

As promised, I have a trio of treat holders to show you, all created with the Scalloped Tag Topper Punch and various other punches:

Stampin_up_scalloped_tag_topper_easter_pals - Copy

I'm so happy with the way these little babies turned out! I found inspiration for each one from MANY different sources, so assigning an original creator would be pretty much impossible.

This little lamb has Calypso Coral twine to hold her together, and the Decorative Dots Textured Impressions Folder was used for al the texture. Her nose is a Blushing Bride Candy Dot, as is the center of the cork embellishment flower. The Calypso Coral twine and the Decorative Dots folder are only available as FREE Sale-a-bration items for ONE MORE DAY ONLY – March 31!

Stampin_up_scalloped_tag_topper_pal_1 - Copy

This little chickie has a tuft of a real feather added with a glue dot (purchased at a craft store), and her beak is from one of the Boho Blossoms, cut across the flower with Paper Snips to create the top and bottom of the beak. Her little feet are also punched with the same Boho Blossom.

Stampin_up_scalloped_tag_topper_pal_2 - Copy

Finally, little Miss Bunny is punched from Baked Brown Sugar cardstock. The center of her ears and her nose are cut from the slot punched out from the top of the Tag Topper Punch!

Stampin_up_scalloped_tag_topper_pal_3 - Copy

I needed a tiny Easter Basket for Miss Bunny, so I used the vest from the Owl Punch and punched a handle with my Small Oval Punch. The "eggs" in the basket are Coastal Cabana and Soft Sky-punched with the smaller eye of the Owl Punch. If you don't have the Owl Builder Punch yet, you NEED it!

That's all for now. Remember, Monday, March 31st is the LAST DAY of Sale-a-bration, so please go to my Online Store before Midnight tonight to place your order and choose your free items! If you have been thinking of joining the Stampin' Up! demonstrator family and would also like to be a part of my group, the Yes, Mam! Stampers, you can sign up while you are there!

Until tomorrow, have a Stampingrox! day!

©Stampin'Up!™1990-2014

Stampin’ Up! Pansy Punch Bunny!

Stampin’ Up! Pansy Punch Bunny!

Hey there! Just a quick post tonight. I spent the last 12 hours at Jessica's, plowing through all the paperwork, getting all her numbers ready for her tax lady, and I am pooped! We got it all done, so we can breathe a sigh of relief!

I do have a cute little treat holder to show you, using the Scalloped Tag Topper Punch for the holder and the Pansy Punch for the bunny ears:

Stampin_up_scalloped_tag_topper_bunny_watermarked

Isn't this the cutest little itty-bitty bunny? She was really quick and easy to make, too!

Stampin_up_scalloped_tag_topper_bunny_2watermarked

I hope to be able to share the directions for both the treat holder and the bunny soon, but now I must send my self to bed. My cold has been much better today. I think I may NOT have a sinus infection, but I've got to get some rest so that trend continues! Hopefully tomorrow I can share directions and pictures  to make this fun little treat!

ETA 3/26/14: Here's a punch page showing all the punches I used to make the bunny:

Bunny punch page - Copy

And here's a quick tutorial to make the Scalloped Tag Topper treat holder:

Punch both ends of a  8 1/2" x 2" strip of Coastal Cabana cardstock with the Scallop Tag Topper Punch. Score the center of the strip at 4 1/8" after you have punched. Score 3/4" on either side of the center scored line. Fold along the two outer score lines to create the base of the treat holder.

Stampin_up_scalloped_tag_topper_egg_holder_1

Cut about 1 or 1 1/2" from scalloped end with Paper Trimmer, cutting only half-way across to create a slit. Flip paper over and cut other end. You will be cutting a slit on the opposite side of the end.

Topper 1

This is what your slits will look like:

Topper 3

Bring the ends of the treat holder together, sliding the slits over each other to close the top:

Topper 4

When you are done the top of your holder will look like this:

Topper 5

That's all for now! Please visit my Online Store to shop and purchase your supplies to create this fun little cutie!

Until tomorrow, have a Stampingrox! day!

Click on any image below to go to my Online Store:

Stampin’ Up! Pansy Punch Bunny!

Stampin’ Up! Pansy Punch Bunny!

Hey there! Just a quick post tonight. I spent the last 12 hours at Jessica's, plowing through all the paperwork, getting all her numbers ready for her tax lady, and I am pooped! We got it all done, so we can breathe a sigh of relief!

I do have a cute little treat holder to show you, using the Scalloped Tag Topper Punch for the holder and the Pansy Punch for the bunny ears:

Stampin_up_scalloped_tag_topper_bunny_watermarked

Isn't this the cutest little itty-bitty bunny? She was really quick and easy to make, too!

Stampin_up_scalloped_tag_topper_bunny_2watermarked

I hope to be able to share the directions for both the treat holder and the bunny soon, but now I must send my self to bed. My cold has been much better today. I think I may NOT have a sinus infection, but I've got to get some rest so that trend continues! Hopefully tomorrow I can share directions and pictures  to make this fun little treat!

ETA 3/26/14: Here's a punch page showing all the punches I used to make the bunny:

Bunny punch page - Copy

And here's a quick tutorial to make the Scalloped Tag Topper treat holder:

Punch both ends of a  8 1/2" x 2" strip of Coastal Cabana cardstock with the Scallop Tag Topper Punch. Score the center of the strip at 4 1/8" after you have punched. Score 3/4" on either side of the center scored line. Fold along the two outer score lines to create the base of the treat holder.

Stampin_up_scalloped_tag_topper_egg_holder_1

Cut about 1 or 1 1/2" from scalloped end with Paper Trimmer, cutting only half-way across to create a slit. Flip paper over and cut other end. You will be cutting a slit on the opposite side of the end.

Topper 1

This is what your slits will look like:

Topper 3

Bring the ends of the treat holder together, sliding the slits over each other to close the top:

Topper 4

When you are done the top of your holder will look like this:

Topper 5

That's all for now! Please visit my Online Store to shop and purchase your supplies to create this fun little cutie!

Until tomorrow, have a Stampingrox! day!

Click on any image below to go to my Online Store:

Stampin’Up! Scalloped Tag Topper Birthday Basics Balloon Card!

Stampin’Up! Scalloped Tag Topper Birthday Basics Balloon Card!

Good morning! My laptop had been grumbling at me for the past couple of days about updates, which I had been ignoring, but last night it refused to upload my camera photos, so I accepted the inevitable, updated, restarted, and went to bed!

This morning the cold/sinus thing is still with me. I feel better, but am debating visiting a clinic to get some meds. The left side of my face is still full of junk!

I know I am feeling better because I sat down and stamped this last night. It just made me happy!

Stampin_up_birthday_basics_label_love_1 - Copy - Copy

Next to Christmas cards, birthday cards are my favorite to make, and this one was pretty quick and easy! Cards with closures made with the Scalloped Tag Topper Punch are very trendy right now. I made this one is a bit easier with a "faux closure". Here's how I did it:

I started with Gumball Green cardstock 4" x just a hair less than 2":

Stampin_up_scalloped_tag_topper_tab_1 - Copy

I punched both ends with the Scalloped Tag Topper Punch:

Stampin_up_scalloped_tag_topper_tab_2 - Copy

I cut the punched strip apart, making one piece 1 1/2" long and the other 2 1/4" long. I added Stampin' Dimensionals to the back of each piece as shown:

Stampin_up_scalloped_tag_topper_tab_3 - Copy

After adhering the pieces to my card front I tied a 12" piece of Raspberry Ripple 3/8" Stitched Satin Ribbon through the slots of the punched ends.

Stampin_up_scalloped_tag_topper_tab_4 - Copy

Inside I used more of the Birthday Basics Designer Paper and a Very Vanilla strip punched with the Scalloped Tag Topper Punch. I stamped a sentiment from the Photopolymer stamp set, Bombs Away Birthday with Raspberry Ripple ink.

Stampin_up_birthday_basics_bombs_away_birthday - Copy

We are nearing the end of Sale-a-bration (ends March 31st!) AND we are also nearing the end of the current Annual Catalog. I'm awful about hoarding Designer Paper, but this year I'm trying to use more of it up before it retires. You will be seeing LOTS more Designer Paper used on my creations and inside the envelopes from now on!

If you haven't subscribed to my newsletter, please do so today. Each newsletter I send out contains an exclusive tutorial just for my newsletter subscribers. My next newsletter will contain a tutorial to make the balloons I have featured on today's card!

I'm including a supply list below that you can use to shop in my Online Store. Click on any of the product pics and you will be taken directly to my store.

Until tomorrow, have a Stampingrox! day!


Stampin’Up! Scalloped Tag Topper Birthday Basics Balloon Card!

Stampin’Up! Scalloped Tag Topper Birthday Basics Balloon Card!

Good morning! My laptop had been grumbling at me for the past couple of days about updates, which I had been ignoring, but last night it refused to upload my camera photos, so I accepted the inevitable, updated, restarted, and went to bed!

This morning the cold/sinus thing is still with me. I feel better, but am debating visiting a clinic to get some meds. The left side of my face is still full of junk!

I know I am feeling better because I sat down and stamped this last night. It just made me happy!

Stampin_up_birthday_basics_label_love_1 - Copy - Copy

Next to Christmas cards, birthday cards are my favorite to make, and this one was pretty quick and easy! Cards with closures made with the Scalloped Tag Topper Punch are very trendy right now. I made this one is a bit easier with a "faux closure". Here's how I did it:

I started with Gumball Green cardstock 4" x just a hair less than 2":

Stampin_up_scalloped_tag_topper_tab_1 - Copy

I punched both ends with the Scalloped Tag Topper Punch:

Stampin_up_scalloped_tag_topper_tab_2 - Copy

I cut the punched strip apart, making one piece 1 1/2" long and the other 2 1/4" long. I added Stampin' Dimensionals to the back of each piece as shown:

Stampin_up_scalloped_tag_topper_tab_3 - Copy

After adhering the pieces to my card front I tied a 12" piece of Raspberry Ripple 3/8" Stitched Satin Ribbon through the slots of the punched ends.

Stampin_up_scalloped_tag_topper_tab_4 - Copy

Inside I used more of the Birthday Basics Designer Paper and a Very Vanilla strip punched with the Scalloped Tag Topper Punch. I stamped a sentiment from the Photopolymer stamp set, Bombs Away Birthday with Raspberry Ripple ink.

Stampin_up_birthday_basics_bombs_away_birthday - Copy

We are nearing the end of Sale-a-bration (ends March 31st!) AND we are also nearing the end of the current Annual Catalog. I'm awful about hoarding Designer Paper, but this year I'm trying to use more of it up before it retires. You will be seeing LOTS more Designer Paper used on my creations and inside the envelopes from now on!

If you haven't subscribed to my newsletter, please do so today. Each newsletter I send out contains an exclusive tutorial just for my newsletter subscribers. My next newsletter will contain a tutorial to make the balloons I have featured on today's card!

I'm including a supply list below that you can use to shop in my Online Store. Click on any of the product pics and you will be taken directly to my store.

Until tomorrow, have a Stampingrox! day!


Theme: Overlay by Kaira
Bonnie, Illinois, USA