Stampin’ Up! It’s Sunday Swap Day with Something for Baby!
Hey there! It's Sunday, which means it's time to share some swaps! I know I've been absent from my blog quite a bit this week. Part of the reason is I broke my camera lens a few weeks ago and now when I take pics with my little point-and-shoot I'm just not happy with them at all. A new lens has finally been ordered, so hopefully it will come in soon and I can get my blogging mojo back.
Today I have three baby cards to share, all using the new set, Something for Baby!
First, Raedean Shibata created this simple congratulations card, including paper-piercing using a template from the Festive Paper Piercing pack and a greeting from Something to Say. She paired Crisp Cantaloupe cardstock with a selection from the Lullaby Designer Paper pack.
She used Crisp Cantaloupe and Hello Honey Stampin' Write Markers to ink the bib stamp. Sooooo cute!
Next, a much larger image from Something for Baby was used for this card, which unfortunately I have lost the creator's info. Some swappers attach their info on the back of the card on a post-it note, which helps me keep the name with the card, but some do not. If it's just loose with the card, it's much more likely to get lost as I take the swaps with me to workshops and classes.
This card features just Whisper White and Daffodil Delight. Just two colors, but it makes a very visually pleasing look! The rhinestones were colored with one of the Daffodil Delight Blendability markers, which should finally be available in a few weeks.
Lastly, I CASED this card from Deb Valder. Deb makes the most amazing cards. I stepped up just a few things, but I'd definitely going to be making more cards with this template, and I know you are going to want to know how!
This card stands up on it's own and is called a "block card". Doesn't it look just like a stack of baby blocks? Images from Something for Baby were cut with the coordinating Baby's First Framelits.
(Please pardon the sawdust. Apparently we have wood bees trying to make a home in our deck roof!) I cut the numbers with the "1, 2, and 3" from the File Tabs Edgelits Dies.
Pretty, pretty, pretty!
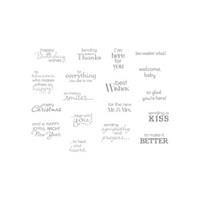
On the top blocks I stamped more phrases from Something to Say:
The tiny little hearts were punched with the Owl Builder Punch.
That's all for now. Here's the supply list for today's cards. Just click on any image and you will be taken to shop in my Online Store:


All images ©Stampin'Up!™1990-2014