Hey there! Yesterday was a CRAZY day! My son just bought his first home; he closed on Thursday! We are so happy for him AND it is next door to Alisa & Cody, so they are over the moon excited too! Since Troy and Cody had yesterday off for Good Friday they decided to try to get AS MUCH DONE AS POSSIBLE this weekend so he can get moved in soon!
I'm helping with the cleaning, painting, and renovations (I'm a consultant for the renovations, but an ACTIVE participant in the cleaning and painting!), so my whole day yesterday was spent at Troy's. I tried to get on here to post my kite tutorial before I left yesterday morning, but something was wrong with Typepad and I couldn't even get in to my blog, so I had to give up and move on.
I'm headed to Troy's again today, but I have a few minutes here to show you how I made the kite from my Stampers Dozen Blog Hop post on Tuesday HERE, and I have two more kite cards to share!
I started by punching a triangle with the Triagle Punch from Whisper White. This triangle is just my base I am going to use to attach the visible kite pieces to:

I adhered a Basic Black triangle over the base trangle, leaving just a bit of the widest part of the triangle visible:

I adhered the straight-sided Petite Pennant punched piece to the remaining strip of the base Triangle. I snipped off the tips of the base triangle that stick out on the edges.
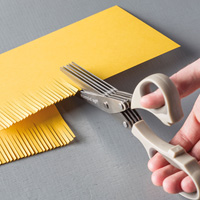
 I cut really thin strips of cardstock for the "struts" of the kite. I adhered them on the kite, then trimmed the ends with my Paper Snips. (sorry for changing kite colors, but apparently as I made three different kites I didn't remember to take pics of every step with the same one! lol! Sometimes I get so caught up in the creative process I forget!)

Here's another card featuring the kite and the Word Bubble clouds I created an embossing plate for. I showed you how I made my plate HERE.

Inside I simply stamped a phrase from Really Good Greetings:

My final kite card I used the Fresh Prints Designer Paper Stack for the kite. I punched the frosting from the Cupcake Builder punch from Whisper White scraps, then sponged Whisper White Craft ink through the negative space for my clouds:

Inside I stamped phrases from Remembering Your Birthday:

That's all for now! Tomorrow is Sunday Swap Day, so I'll be back then with some fun swaps to share!
Oh, in case you haven't heard, Monday, April 21st Stampin' Up! will be releasing the Retiring Stamps and Accessories Lists! This year BOTH lists will be while-supplies-last, so get your order in quick!
AND >>>>>>>> April 21st through 25th ONLY!

You will probably want to order a lot of things next week, so until then, (and tomorrow!) have a Stampingrox! day!
All images ©Stampin'Up!™1990-2014