Category: Punches

Stampin’Up! Scalloped Tag Topper Bunny Box!

Stampin’Up! Scalloped Tag Topper Bunny Box!

Hey there! I've had a fun day today, creating and CASEing some new projects! The first one I want to show you is another project you can choose to make at my Happiest Day Class this Friday. I was inspired by Michelle Last of the UK to make these bunny boxes:

Stampin_up_scalloped_tag_topper_box_1

I made a few minor changes, but the basic construction is all Michelle's. You can view her video and instructions HERE. I hope after you view her instructions you will be inspired to come back and purchase your Stampin' Up! supplies from me in my online store. (USA residents cannot purchase from UK demos and vice-versa)

Stampin_up_scalloped_tag_topper_box_2 - Copy

I added little "bunny tails" to mine with hearts punched from Blushing Bride Patterns Designer Paper and the Small Heart Punch.

Stampin_up_scalloped_tag_topper_box_6 - Copy

The box opens and can hold several pieces of chocolate! (is there any other kind of candy?)

Stampin_up_scalloped_tag_topper_box_3 - Copy

I added an easter-egg basket to the Early Espresso bunny with the Large and Extra-Large Oval punches, the circle punch from the Itty Bitty Shapes Punch Pack for the "eggs", and the Square Lattice Textured Impressions Folder for the baskets' "weave".

Stampin_up_scalloped_tag_topper_box_4 - Copy

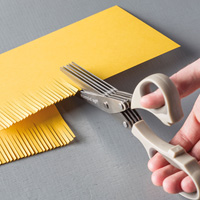
When you watch Michelle's video, she will give you some tips for cutting the flower stems with the Fringe Scissors! You tie the twine around the stems before you make the final cut from the cardstock, an ingenius way to keep the stems together as you tie the bow!

Stampin_up_scalloped_tag_topper_box_5 - Copy

I stamped and cut out this bunny's egg with the Backyard Basics Bundle of stamp set and Big Shot framelits.

That's all for now. I hope you are now inspired (and instructed) by Michelle's video to make your own bunny boxes! If you have any questions, you can just leave me a comment or email me: carol@carolpaynestamps.com

Until tomorrow, have a Stampingrox! day!

Here's the supply list to make the bunny boxes:


©Stampin'Up!™1990-2014

Stampin’ Up! New Weekly Deals Are No April Fool!

Stampin’ Up! New Weekly Deals Are No April Fool!

Hey there and good morning! I have been having a terrible early-morning insomnia, which has been chopping out at least 2 hours of my sleep time for the past several nights. I can tell it has really affected my creativity and my productivity. Last night, however, all the sleeplessness must have finally caught up with me because I finally slept through and feel so much better!

I plan to do a lot of stamping today, so I will have something to post later, but for now I wanted to make sure you had the newest Weekly Deals from Stampin' Up!

1972429_10202861152523987_1608208606_n

So great fun things to use on sale here for 25% off! Go to my Online Store HERE to shop. Sale-a-bration is over, but you can still order these great deals, as well as shop the Clearance Rack and regular catalogs!

Until tomorrow, have a Stampingrox! day!

 ©Stampin'Up!™1990-2014

Stampin’ Up! New Weekly Deals Are No April Fool!

Stampin’ Up! New Weekly Deals Are No April Fool!

Hey there and good morning! I have been having a terrible early-morning insomnia, which has been chopping out at least 2 hours of my sleep time for the past several nights. I can tell it has really affected my creativity and my productivity. Last night, however, all the sleeplessness must have finally caught up with me because I finally slept through and feel so much better!

I plan to do a lot of stamping today, so I will have something to post later, but for now I wanted to make sure you had the newest Weekly Deals from Stampin' Up!

1972429_10202861152523987_1608208606_n

So great fun things to use on sale here for 25% off! Go to my Online Store HERE to shop. Sale-a-bration is over, but you can still order these great deals, as well as shop the Clearance Rack and regular catalogs!

Until tomorrow, have a Stampingrox! day!

 ©Stampin'Up!™1990-2014

Stampin’ Up! Wildflower Meadow!

Stampin’ Up! Wildflower Meadow!

Hey there! Hope you've had as good of a Sunday as I've had! Most of the fam here for lunch and the afternoon, then homemade pizza after nighttime church!

I've been playing with my punches quite a bit, working on cards to encourage me that spring is really coming:

Stampin_up_chevron_lattice_1 - Copy

I sponged the raised image from embossing the Wisteria Wonder layer with the Wildfower Meadow Textured Impressions Folder with Wisteria Wonder ink to make it "pop".

After I adhered the Petite-Petals-punched flowers to the trellis, I realized you really can't see the trellis, but I like it anyway!

Stampin_up_chevron_lattice_2 - Copy'

I stamped a sentiment from Feel Goods, and the teapot/vase image from Tea Party on the inside. I stamped the watercolor splotch from Happy Watercolor behind the flowers to add a little color to the Jet Black StazOn stamped image.

That's all for now. The spring forward to Daylight Savings Time has wiped me out!

Until tomorrow, have a Stampingrox! day!

Find all the supplies to make this card, click HERE to go to my Online Store or click on any of the highlighted products listed below:

Simply Sketched Hostess (Happy Birthday Wishes) #129669 wood-mount, #129672 clear-mount

Feel Goods #131916 wood-mount $25.95 #129684 clear-mount $18.95

Tea Party #129135 wood-mount $22.95, $129138 clear-mount $16.95

Happy Watercolor #

Whisper White 8 1/2" x 11" cardstock #100730 $8.50 (40 sheets)

Wisteria Wonder 8 1/2" x 11" cardstock #122922 $6.95 (24 sheets)

Pear Pizzazz 8 1/2" x 11" cardstock #131201 $6.95 (24 sheets)

Afternoon Picnic Designer Series Paper #131390 $10.95

Wisteria Wonder Inkpad #126985 $5.95

Elegant Eggplant Inkpad #126969 $5.95

Wildflower Meadow Textured Impressions Folder #129376 $7.95

Circle Card Thinlet Dies (frame around happy birthday greeting) #133480 $32.95

Chevron Border Punch #132154 $21.95

Petite Petals Punch#133322 $12.95

Bird Builder Punch (leaves) #117191 $16.95

Rhinestone Basic Jewels #119246 $4.95

Stampin' Sponges #101610 $3.50

SNAIL adhesive #104332 $6.95

Stampin' Dimensionals #104430 $3.95

Glue Dots #103683 $4.95


All products used are ©Stampin'Up!™1990-2014

Stampin’ Up! Hexagon Hive and Nature’s Hello!

Stampin’ Up! Hexagon Hive and Nature’s Hello!

Hey there! I've been working on the dreaded taxes all day, but I had to switch to stamping after supper. I just couldn't stand it any more. I have a few more days until they have to go to the accountant, so I took a "stamping break"!

Quite often when I'm playing with a new product, I have more ideas than one card can hold, so if I have time I make another version. Such is the case with today's sample. I showed yesterday's and today's cards to my husband and his remark was, "they are the same . . . but different":

Stampin_up_natures_hello

Two of the main differences: I used the flower from Natures Hello instead of Secret Garden, and I used a different piece of Afternoon Picnic Designer Paper behind the Hexagon Hive Thinlet. I stamped the Hardwood on the Hexagon Hive with Crumb Cake ink on the Sahara Sand. It gives it the look of old weathered barn siding.

Stampin_up_lovely_romance

I used a sentiment from Lovely Romance for the inside. I did not re-ink the Hardwood background before stamping on the inside layer. I just "huffed" on the stamp to re-moisten the ink before stamping. It gives it just a hint of the hardwood look but doesn't compete with the sentiment.

Here's yesterday's sample side by side with todays:

Stampin_up_hexagon_hive_two

Which one do you like the best? Leave me a comment, I really want to know!

Here's a supplies needed to make this card. Just click on any of the highlighted products below to go directly to my Online Store to order:

Soft Suede 8 1/2" x 11" cardstock

Afternoon Picnic Designer Series Paper

Hexagon Hive Thinlet Die

Petite Petals Bundle

Secret Garden Framelits

Pearls Basic Jewels

Lovely Romance

Hardwood

That's all for now. Until tomorrow, have a Stampingrox! day!


All products used are ©Stampin'Up!™1990-2014

Stampin’ Up! Geometrical Cheer Up! Owl!

Stampin’ Up! Geometrical Cheer Up! Owl!

Hey there! I'm back again today with another card using the Geometrical stamp set and the Owl Builder Punch. I think I'm a little obsessed, but the phrases in this set are just so different from anything we've had in awhile, I'm really diggin' it! Stampin_up_geometrical_owl_buttercup
I started with a cardbase of Coastal Cabana, then added a layer of Soft Suede that I embossed with the Woodgrain Textured Impressions Folder. Before I embossed the Soft Suede, however, I stamped the tree branch from Take Care with Early Espresso ink so I would have something for my little owl to sit on!

Today's owl is Early Espresso with a vest of Retro Fresh Designer Paper and those adorable Gold Sequin Trim eyes!

I inked the "cheer up buttercup" stamp from Geometrical with my Tangerine Tango, Coastal Cabana, and Early Espresso Stampin' Write Markers, then stamped on a scrap of Naturals Ivory. I cut it out with one of the Word Bubbles Framelit Dies in the Occasions Catalog, then mounted it above the owl with Stampin' Dimensionals.

Stampin_up_geometrical_peachy_keen

Inside I simply inked "you're Peach keen" from the Peachy Keen stamp set with the same markers. Those cute little "arrowheads" are inked with the same colors too and mimic the designer paper vest on the owl! I love the way Stampin' Up! coordinates several different products into a "suite"! You will find all this suite on pages 18-19 of the New Occasions Catalog.

That's all for now! Tomorrow is my "Yes, Mam! Stampers" downline meeting and I am prepping this card for the Shoebox Swap! yay!

To purchase your supplies to make this card, click HERE

Until tomorrow, which is Sunday Swap Day, have a Stampingrox! day!


All products used are ©Stampin'Up!™1990-2014

Stampin’ Up! Geometrical Meets the Owl!

Stampin’ Up! Geometrical Meets the Owl!

Hey there! I had a post almost completely ready to go last night, but I fell asleep with my hands still on the keyboard and when I woke up the post was gone. I hate when I do that. I just closed the computer and went to bed. sigh.

Even though that post is gone forever, I still have the card to show you!

Stampin_up_geometrical_owl_on_film_1

When I was creating the Geometrical card I showed you a few days ago HERE the idea for this one starting percolating in my brain and I couldn't stop thinking about it! The sequins on the "oo" just looked too much like owl eyes to ignore, so last night I sat down an made this card with the Woodgrain Textured Impressions Folder, Retro Fresh Desginer Paper, Gold Sequin Trim, Geometrical stamp set, Owl Builder Punch, Chevron Border Punch, and the new On Film Framelits Dies.

I pullled the colors of Coastal Cabana, Tangerine Tango, and So Saffron from the DSP, then added Naturals Ivory, Soft Suede, and Early Espresso. It's a lot more colors than I usually work with at one time on one card, but it worked!

I inked the "hooray" first with my Early Espresso Stampin' Write Marker, then stamped on the Naturals Ivory paper. I cleaned and dried my stamp on my Stampin' Scrub, then tested it for dryness on scratch paper before re-inking "for today" with my Tangerine Tango marker. I then moved over a couple of letters and lined up the un-inked "Hooray" with the stamped "Hooray" and stamped "for today" so it is more right-justified than on the original stamp. (my stamps today are wood-mount, but you can do the same thing with the clear-mount stamps) This left me room to add the owl from the Owl Builder punch with those Gold Sequin Trim eyes!

Before I added the owl, I embossed the Naturals Ivory layer with my Woodgrain Textured Impressions Folder, then lightly sponged Soft Suede ink over the woodgrain ridges. I attached this layer to the Early Espresso card base with Stampin' Dimensionals for a firmer attachment than just using SNAIL adhesive would give with all the texture on the paper after embossing.

My owl looked a little lost on the card until I added the Coastal Cabana "polaroid" frame from the On Film Framelits Dies with Stampin' Dimensionals. I added punched chevrons of Tangerine Tango, Early Espresso, and So Saffron, and then added a Gold Sequin to each.

Stampin_up_chalk_talk_chevron_border

Inside I used "happy BIG day" from the Chalk Talk stamp set, stamped in Early Espresso and cut out with one of the Chalk Talk framelits. I layered it on a Tangerine Tango and a Coastal Cabana-punched Decorative Label. More punched chevrons give the bottom of this card a coordinated look!

This card would work well for a birthday, graduation, or even retirement card, yes?

That's all for now! I have another card to show you tomorrow, also using the Geometrical stamp set and Owl Builder Punch! Whoo Hoo!

To order the supplies to make this card, click HERE to go to my Online Store.

(BTW, I think this post is even better than the one I lost last night, yay!)

Until tomorrow, have a Stampingrox! day!

All products used are ©Stampin'Up!™1990-2014

Theme: Overlay by Kaira
Bonnie, Illinois, USA