Tag: In Color Dahlias

Stampin’ Up! Fabric Flowers on Cardstock!

Stampin’ Up! Fabric Flowers on Cardstock!

Hey there! I'm heading to the dr later today to see what they can do for this crud I have. Every year in May I go down with a massive seasonal allergy attack that leaves me coughing, feverish, and feeling overall lousy. I have allergy meds I take all year long, and a few other daily things to help keep my allergies at bay the rest of the time, but when the wheat blooms (which this year is all around my house!) I'm done for.

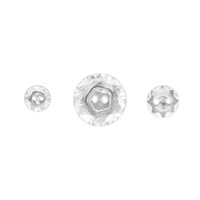
Today I have a different bloom for you, fabric flower blooms:

Stampin_up_fun_flowers_bigz_1

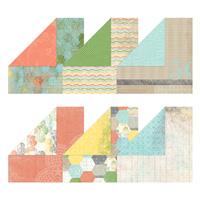
I had a request from a hostess last month for a fabric flower bouquet and matching card so this is what I came up with. Stampin' Up! doesn't sell fabric anymore, so I broke in to my stash of fat quarter bundles to find this fabric. I matched this bundle with Midnight Muse, Gumball Green, and Marina Mist!

Stampin_up_thoughts_prayers_flower_1 - Copy

For shape we adhered cardstock to the fabric using the Multipurpose Adhesive Sheets (retiring), then we cut them with a retiring flower die, the Fun Flowers Bigz L.

My next newsletter (going out tomorrow) will contain a tutorial to make these flowers, so if you aren't subscribed to receive my newletters, please go over to my sidebar to the "sign up for my email newsletter" box and sign up!

Stampin_up_thoughts_prayers_2 - Copy

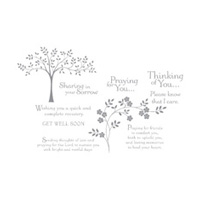
We stamped the inside and the envelope with Petite Petals flowers.

Here's a few new things you don't want to miss from Stampin' Up!

1948204_10202973756617376_1113070365322370606_n


STARTING TOMORROW! WHILE SUPPLIES LAST!


Retired List Blowout Sale!

Get excited! Beginning May 22, 2014,We will be offering a 25%-50% discount on many of the retiring products. This begins May 22, but you have to act fast, as this special offer is only good while supplies last!  

 Check here and on my Facebook Page, Carol Payne Stamps, for updated Retiring Stamps and Accessories Lists with the Discounted Pricing!

Here's your shopping list for my Online Store for tomorrow!


©Stampin'Up!™1990-2014

Until tomorrow, have a Stampingrox! day!

Stampin’ Up! Geometrical Hooray for Today!

Stampin’ Up! Geometrical Hooray for Today!

Hey there! Hope you enjoyed the hop yesterday! If you haven't taken the May Edition of the Stampers Dozen Blog Hop: I Do!, click HERE to start at my blog, then hop all the way through 11 more blogs to see the imaginative wedding-themed creations we have for you!

Today I decided to share a quick and simple card using the Geometrical stamp set from the Occasions Catalog. This super-duper catalog expires in just a few short weeks, but thankfully this stamp set is carrying over, so you will still be able to order it at least until the end of May 2015!

Stampin_up_geometrical_1 - Copy

Supplies used on this card you will NOT be able to order after June 1st:

Midnight Muse 8 1/2" x 11" cardstock (sold out)

Midnight Muse inkpad (still available but the ink refill is sold out)

Summer Starfruit Stampin' Write Marker (from the 2012-2014 In Color Marker set which is NOT sold out yet)

Gingham Garden Designer Series Paper

Simply Stars Stamp Set (sold out)

In Color Dahlias

Stripe Textured Impressions Folder

Bring on the Cake Stamp Set (sold out)

Stampin_up_geometrical_2 - Copy

I apologize that so many of the products used on this card are now sold out. I decided to share it with you anyway because the layout is so simple and adaptable to future stamps, inks, designer papers, and embossing folders.

That's all for now. Below is the short  list of  products still availalble in my Online Store. Go get them today while you can! Until tomorrow, have a Stampingrox! day!

©Stampin'Up!™1990-2014

Stampin’ Up! Geometrical Hooray for Today!

Stampin’ Up! Geometrical Hooray for Today!

Hey there! Hope you enjoyed the hop yesterday! If you haven't taken the May Edition of the Stampers Dozen Blog Hop: I Do!, click HERE to start at my blog, then hop all the way through 11 more blogs to see the imaginative wedding-themed creations we have for you!

Today I decided to share a quick and simple card using the Geometrical stamp set from the Occasions Catalog. This super-duper catalog expires in just a few short weeks, but thankfully this stamp set is carrying over, so you will still be able to order it at least until the end of May 2015!

Stampin_up_geometrical_1 - Copy

Supplies used on this card you will NOT be able to order after June 1st:

Midnight Muse 8 1/2" x 11" cardstock (sold out)

Midnight Muse inkpad (still available but the ink refill is sold out)

Summer Starfruit Stampin' Write Marker (from the 2012-2014 In Color Marker set which is NOT sold out yet)

Gingham Garden Designer Series Paper

Simply Stars Stamp Set (sold out)

In Color Dahlias

Stripe Textured Impressions Folder

Bring on the Cake Stamp Set (sold out)

Stampin_up_geometrical_2 - Copy

I apologize that so many of the products used on this card are now sold out. I decided to share it with you anyway because the layout is so simple and adaptable to future stamps, inks, designer papers, and embossing folders.

That's all for now. Below is the short  list of  products still availalble in my Online Store. Go get them today while you can! Until tomorrow, have a Stampingrox! day!

©Stampin'Up!™1990-2014

Stampin’ Up! Hello Lovely Reverse Easel Tutorial!

Stampin’ Up! Hello Lovely Reverse Easel Tutorial!

Hey there! As promised, here is another Reverse Easel card, this time with the "Hello, Lovely" stamp set and Epic Day This and That Designer Series Paper.

Tip: Designer Series Paper (aka DSP) is the lovely 2-sided paper Stampin' Up! sells. There's a different design on each side of each sheet. Lots of choices! yay!

Stampin_up_hello_lovely_1

My card base is Gumball Green, layered with Pool Party, then the Epic Day paper, and tied with a Gumball Green 3/8" Stitched Satin Ribbon.

Stampin_up_hello_lovely_2 - Copy

I brayered a Tea Lace Doily with Pool Party ink, then layered on a Whisper White strip that I embossed with one of the Delicate Designs Textured Impressions Folders and my Big Shot.

I inked my stamp with Gumball Green and Pool Party markers, then punched the image with the Decorative Label Punch. I layered a couple of Pool Party Decorative Labels behind the greeting before adhering to the card over the ribbon with Stampin' Dimensionals.

Tip: Stampin' Dimensionals give the perfect "lift" for both interest and to let the ribbon do it's job without popping the label off.

Lastly, I added a Summer Starfruit In Color Dahlia to make it all pop!

Pssst. . . Gumball Green and Summer Starfruit are 2012-2014 In Colors, which will be retiring at the end of May, so if you want these colors in cardstock, ink, markers, ribbon or Dahlia's, you need to order them now!

Stampin_up_hello_lovely_4 - Copy

Inside I stamped a sentiment from "Take Care", cut it out with a Deco Label Framelit, and then layered a Pool Party Deco Label behind it.

Here's my tutorial for the "Reverse Easel" technique:

Card base dimensions: 12" x 4", scored at 2", 5 1/2", and 9".

Lay 3" long end of the card base up against the ruler of the Envelope Punch Board, putting the left edge at 1 1/2". Punch but do not score.

IMG_5538 - Copy

Flip the card over and repeat with the left edge again at 1 1/2". You will have one "peak" along the edge.

IMG_5539 - Copy

You will cut off the ends of the cardstock from the peak out to the corners of the card base with the Paper Trimmer.

IMG_5540 - Copy

One end of your card base will now have a tab that looks like this:

IMG_5541 - Copy

On the opposite end, line up the Word Window Punch  as shown to punch a slot to insert the tab when the card is standing up. I lined up the "patent numbers" on the back of the punch with the fold of the card base, then "eye-balled" the sides for eveness. ("eye-balled" is my word for guessing as accurately as I can just by looking but not measuring. I was an awful "eye-baller" when I started stamping 11 years ago, but I'm much better now!)

IMG_5543 - Copy

After folding on all the scored lines, here's what my card base looks like:

IMG_5545 - Copy

Insert the tab on one end into the slot on the other end:

IMG_5546 - Copy

You now have a little easel. I adhered the card front to one side with Sticky Strip.

IMG_5547 - Copy

The folds will lay flat to insert into an envelope!

Stampin_up_hello_lovely_fb_1 - Copy

That's all for now! See the supply list to create this card below. All items can be ordered from My Online Store. Until tomorrow, have a Stampingrox! day!


Stampin’ Up! Hello Lovely Reverse Easel Tutorial!

Stampin’ Up! Hello Lovely Reverse Easel Tutorial!

Hey there! As promised, here is another Reverse Easel card, this time with the "Hello, Lovely" stamp set and Epic Day This and That Designer Series Paper.

Tip: Designer Series Paper (aka DSP) is the lovely 2-sided paper Stampin' Up! sells. There's a different design on each side of each sheet. Lots of choices! yay!

Stampin_up_hello_lovely_1

My card base is Gumball Green, layered with Pool Party, then the Epic Day paper, and tied with a Gumball Green 3/8" Stitched Satin Ribbon.

Stampin_up_hello_lovely_2 - Copy

I brayered a Tea Lace Doily with Pool Party ink, then layered on a Whisper White strip that I embossed with one of the Delicate Designs Textured Impressions Folders and my Big Shot.

I inked my stamp with Gumball Green and Pool Party markers, then punched the image with the Decorative Label Punch. I layered a couple of Pool Party Decorative Labels behind the greeting before adhering to the card over the ribbon with Stampin' Dimensionals.

Tip: Stampin' Dimensionals give the perfect "lift" for both interest and to let the ribbon do it's job without popping the label off.

Lastly, I added a Summer Starfruit In Color Dahlia to make it all pop!

Pssst. . . Gumball Green and Summer Starfruit are 2012-2014 In Colors, which will be retiring at the end of May, so if you want these colors in cardstock, ink, markers, ribbon or Dahlia's, you need to order them now!

Stampin_up_hello_lovely_4 - Copy

Inside I stamped a sentiment from "Take Care", cut it out with a Deco Label Framelit, and then layered a Pool Party Deco Label behind it.

Here's my tutorial for the "Reverse Easel" technique:

Card base dimensions: 12" x 4", scored at 2", 5 1/2", and 9".

Lay 3" long end of the card base up against the ruler of the Envelope Punch Board, putting the left edge at 1 1/2". Punch but do not score.

IMG_5538 - Copy

Flip the card over and repeat with the left edge again at 1 1/2". You will have one "peak" along the edge.

IMG_5539 - Copy

You will cut off the ends of the cardstock from the peak out to the corners of the card base with the Paper Trimmer.

IMG_5540 - Copy

One end of your card base will now have a tab that looks like this:

IMG_5541 - Copy

On the opposite end, line up the Word Window Punch  as shown to punch a slot to insert the tab when the card is standing up. I lined up the "patent numbers" on the back of the punch with the fold of the card base, then "eye-balled" the sides for eveness. ("eye-balled" is my word for guessing as accurately as I can just by looking but not measuring. I was an awful "eye-baller" when I started stamping 11 years ago, but I'm much better now!)

IMG_5543 - Copy

After folding on all the scored lines, here's what my card base looks like:

IMG_5545 - Copy

Insert the tab on one end into the slot on the other end:

IMG_5546 - Copy

You now have a little easel. I adhered the card front to one side with Sticky Strip.

IMG_5547 - Copy

The folds will lay flat to insert into an envelope!

Stampin_up_hello_lovely_fb_1 - Copy

That's all for now! See the supply list to create this card below. All items can be ordered from My Online Store. Until tomorrow, have a Stampingrox! day!


Stampin’ Up! Weekly Deals!

Stampin’ Up! Weekly Deals!

Good morning! Stampin' Up! has started a new promotion of "weekly deals"! Each Tuesday they will post a set of stampin' products on sale between 25 and sometimes up to 50% off! You can order these in my Online Store: www.carolpayne.stampinup.net or through a workshop or individual customer order!

1377376_10201633275307824_1362101349_n

Contact me to order or click on the "shop now" button to go to my Online Store!

All orders of $25 or more qualify for "Bluesox Rewards"!

Have a Stampingrox! day!


All products used are ©Stampin'Up!™1990-2013

Stampin’ Up! Weekly Deals!

Stampin’ Up! Weekly Deals!

Good morning! Stampin' Up! has started a new promotion of "weekly deals"! Each Tuesday they will post a set of stampin' products on sale between 25 and sometimes up to 50% off! You can order these in my Online Store: www.carolpayne.stampinup.net or through a workshop or individual customer order!

1377376_10201633275307824_1362101349_n

Contact me to order or click on the "shop now" button to go to my Online Store!

All orders of $25 or more qualify for "Bluesox Rewards"!

Have a Stampingrox! day!


All products used are ©Stampin'Up!™1990-2013

Theme: Overlay by Kaira
Bonnie, Illinois, USA