Tag: Christmas

Stampin’ Up! Founders Circle and a Dazzling Diamonds Snowflake!

Stampin’ Up! Founders Circle and a Dazzling Diamonds Snowflake!

Hey there!  Now that our family vacation is over (insert frowny face) I'm back to daily blogging. This has been one CRAZY busy summer!

I didn't go to the Stampin' Up! convention this year. Last year I stayed home to help with baby Oakley. (no frowny face) This year I had to cancel again (but all is well)  Friday night I received this text, "You got Founders Circle!" I'm honored and humbled to be in the Top 100 Stampin' Up! demonstrators in the U.S.

10489620_947084535308533_4677575354108542814_n

I've already registered for the Founders Circle Retreat in St George, Utah in September, my fifth since 2008.  My customers, downline, and family deserve all my thanks.They stamp with me, work with me, and put up with me and my stampy chaos!

This weekend is my Christmas in July card class. Here is one card we are making, using the new Whats Up punch, new Dazzling Diamonds Glimmer paper, and a future hostess set:

Stampin_up_dazzling_diamonds_snowflake_1 - Copy

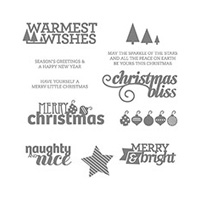
I used Snowflake Soiree (soon retiring) on the inside with Encore Metallic Silver ink and a phrase from the new Christmas Bliss photopolymer, which is while-supplies-last.

Stampin_up_dazzling_diamonds_snowflake_2 - Copy

This card was inspired by Canadian demonstrator Jackie Topa.

If you haven't RSVP'd yet for Christmas in July, please do so today!

Here's today's supply list. You can click on any image or click HERE to shop in my Online Store:

All images ©Stampin'Up!™1990-2014

Stampin’ Up! Wonderful Blessing Card By Sara!

Stampin’ Up! Wonderful Blessing Card By Sara!

Hey there! I love to open Christmas cards when they come in the mail. I love them all; the ones purchased with thougtfullness and love at the store, and family photo cards, but I especially love the hand-stamped ones I receive from my lovely stamping friends! Today's card was created by Sara Harris:

Stampin_up_wonderful_blessings_1

Sara used some new and some retired Stampin' Up! product for her unique layout. It has a very vintage-y feel! I won't even try to attempt to name the retired products she used, but I can tell you she used Crumb Cake cardstock for her card base and the Wonderful Blessing single stamp (#134779 $8.95) for her focal image:

Stampin_up_wonderful_blessings_2

I love this z-folded presentation!

Stampin_up_wonderful_blessings_3

As best I can tell (I haven't had time to contact Sara to ask for the answer to this question) Sara clear heat-embossed the image on Crumb Cake cardstock, then either sponged it with Illuminate Glimmer ink or retired Shimmer Paint. As a final touch she sponged the "peace on earth" phrase from the stamp with what I believe is retired Riding Hood Red ink and added a Rhinestone Basic Jewel.

I love this card!

The stamps on the Single Stamps flyer will only be available until January 31, 2014, so don't delay ordering!

Click HERE to order from my Online Store.

That's all for now! I have another card from a stamping friend to show you tomorrow, this time one from my new downline, Angie!

Until tomorrow, have a Stampingrox! day!


All products used are ©Stampin'Up!™1990-2013

Stampin’ Up! Wonderful Blessing Card By Sara!

Stampin’ Up! Wonderful Blessing Card By Sara!

Hey there! I love to open Christmas cards when they come in the mail. I love them all; the ones purchased with thougtfullness and love at the store, and family photo cards, but I especially love the hand-stamped ones I receive from my lovely stamping friends! Today's card was created by Sara Harris:

Stampin_up_wonderful_blessings_1

Sara used some new and some retired Stampin' Up! product for her unique layout. It has a very vintage-y feel! I won't even try to attempt to name the retired products she used, but I can tell you she used Crumb Cake cardstock for her card base and the Wonderful Blessing single stamp (#134779 $8.95) for her focal image:

Stampin_up_wonderful_blessings_2

I love this z-folded presentation!

Stampin_up_wonderful_blessings_3

As best I can tell (I haven't had time to contact Sara to ask for the answer to this question) Sara clear heat-embossed the image on Crumb Cake cardstock, then either sponged it with Illuminate Glimmer ink or retired Shimmer Paint. As a final touch she sponged the "peace on earth" phrase from the stamp with what I believe is retired Riding Hood Red ink and added a Rhinestone Basic Jewel.

I love this card!

The stamps on the Single Stamps flyer will only be available until January 31, 2014, so don't delay ordering!

Click HERE to order from my Online Store.

That's all for now! I have another card from a stamping friend to show you tomorrow, this time one from my new downline, Angie!

Until tomorrow, have a Stampingrox! day!


All products used are ©Stampin'Up!™1990-2013

Stampin’ Up! Very Merry Tags!

Stampin’ Up! Very Merry Tags!

Hey there! I finished the prep for my class later today. I used the Very Merry Tags set from the Holiday Catalog for the tags for the grab bags:

Stampin_up_very_merry_tags_1

I covered the clothespins with Season of Style Washi Tape.  Here are close-ups of the tags:

Stampin_up_very_merry_tags_2

I used the 2 3/8" Scallop Circle, 1 3/4" Circle, Extra Large Oval, and 1 3/4" Scallop Circle for these.

Stampin_up_very_merry_tags_3

Decorative Label Punch, 2 3/8" Scallop Circle, White Cardstock Vellum, and the Perfect Polka Dot Folder to emboss the vellum.

Stampin_up_very_merry_tags_4

Mosaic Punch, Artisan Punch, and a bit of Cherry Cobbler Dazzling Details!

Stampin_up_very_merry_tags_5

Petite Curly Label punch and 1 1/4" Scallop Circle punch.

Stampin_up_very_merry_tags_6

The tag may say, "do not open until christmas", but guests tomorrow will be allowed to open these. The tags will be reusable, so someone may have to obey this one!

That's all for now! You can go to my Online Store HERE to shop for your stamping supplies! Just a few more days left for Christmas delivery!

Until tomorrow, have a Stampingrox! day!

All products used are ©Stampin'Up!™1990-2013

Stampin’ Up! Clearance Rack Blitz Starts TODAY and New Weekly Deals!

Stampin’ Up! Clearance Rack Blitz Starts TODAY and New Weekly Deals!

Hey there, this post is full of good info, if not inspiration for your Christmas shopping and personal crafting needs!

1476699_10202155988532864_133243940_n

Click HERE  to check it out in my Online Store!

Here's my CHRISTMAS GIFT TO YOU to sweeten the deal:

From now until Sunday, December 15th, every $25 order placed in my Online Store,  called, texted, or emailed in to me will receive 4 of the completed projects from my Christmas Catch-Up Class free from me! Just make sure you check the box to allow me to contact you as your demonstrator when you set up your account. I will email you up-close pictures of the projects so you can choose which ones you want! I will start mailing the completed projects to you next week!

029


Here's just a few examples of past holiday favs you will find on the Clearance Rack! You will need to go to my store to view the sale prices:

127832L

119847L

127813L

127814S 126908L

128069L

126921L

There's lots of fun non-holiday items drastically reduced too!

While you are there, you can order these Weekly Deals too:

564649_10202075273077492_46652256_n


Your order can be from ANY CURRENT CATALOG, Clearance Rack, Weekly Deal, MY Digital Studio downloads, ANYTHING that can be currently orderd qualifies for MY CHRISTMAS GIFT!

That's all for now! Don't forget if you are local to me you can still RSVP for my Christmas Catch-Up and Customer Appreciation Class this Friday, December 13 from 1-9 p.m and make the projects you choose yourself!

Until tomorrow, have a Stampingrox! day!


All products used are ©Stampin'Up!™1990-2013

Stampin’ Up! Envelope Punch Board Treat Pocket!

Stampin’ Up! Envelope Punch Board Treat Pocket!

Hey there! I have another fun project using the Envelope Punch Board today! It's another treat holder, this time using Winter Frost Specialty Designer Paper, the Best of Christmas Stamp set, and the Christmas Ornament Punch!

Stampin_up_winter_frost_pocket_treat_1

This project is QUICK, QUICK, QUICK! Just cut your paper to size, score and punch with the Envelope Punch Board, fold, adhere with a bit of SNAIL adhesive, and embellish! After I stamped the ornament with Island Indigo ink, I punched it out with the Christmas Ornament Punch. I tied a bit of Whisper White Organza Ribbon around the pocket, then adhered the ornament to the pocket with Stampin' Dimensionals. This little pocket fits a single piece of the "G" brand chocolates perfectly!

Stampin_up_winter_frost_pocket_treat_3

For the final touch I added a bit of bling to the ornament with my Silver Dazzling Details! It complements the Smoky Slate in the Winter Frost Specialty Designer Paper perfectly!

Stampin_up_winter_frost_pocket_treat_2

I used one of the stamps from the Christmas Collectibles stamp set on the back side because it already has a "to:" and "from" in it! This would be a perfect co-worker gift, wouldn't it?

In case you haven't seen the Envelope Punch Board in action, here's a video by Stampin' Up! showcasing the basics of operation and how to make a custom envelope with it:


The Envelope Punch Board #133774 $19.95 can be ordered in my Online Store:

www.carolpayne.stampinup.net

All orders of $25 or more qualify for my Bluesox Free Stamps Rewards Program!

Until tomorrow, have a Stampingrox! day!

All products used are ©Stampin'Up!™1990-2013

Stampin’Up! Wonderful Blessing Ornament!

Stampin’Up! Wonderful Blessing Ornament!

Hey there! We had a wonderful Saturday with our house full of family, good food, fun games, a personality quiz, and lots of laughter!

Cohen & Jaxon spent the night so Johnny & Jessica & Ava could take Maddie Kate to her first Cheer Competition in Mt Vernon, and Kimmy & Liam spent the night just because! SO FUN!

My project to share with you today is another from my upcoming Christmas Catch-up Class on December 13th! If you are local to me, please let me know of your intentions to come!

We will be using the Wonderful Blessing Single Stamp to create this easy ornament. I white heat-embossed the image on Midnight Muse cardstock, then cut it out with one of the Circle Collection Framelits. I layered it on a Silver Glimmer circle, then another Midnight Muse circle. I used my hot glue gun to add the 1/8" Silver Ribbon to the back of the ornament.

Stampin_up_wonderful_blessing_1

Up super-close you can see the fine detail of the Wonderful Blessing image. I added just a touch of bling with a Rhinestone Basic Jewel to the Christmas star.

Stampin_up_wonderful_blessing_3

On the back side I covered the hot-glued ribbon with a circle of Winter Frost Specialty Designer Paper, then a Whisper White circle that I stamped with one of the phrases from More Merry Messages with Midnight Muse ink.

Stampin_up_wonderful_blessing_2

This is really an easy ornament. I need to make a few more of these even before the class on the 13th!

That's all for now. Thanks so much for stopping by. You can order the supplies to make your own from my Online Store: www.carolpayne.stampinup.net

Until tomorrow, have a Stampingrox! day!


All products used are ©Stampin'Up!™1990-2013

Theme: Overlay by Kaira
Bonnie, Illinois, USA