Tag: Mossy Meadow

Stampin’ Up! Clean & Simple Ornamental Pine!

Stampin’ Up! Clean & Simple Ornamental Pine!

Hey there! I spent my Wednesday stamping, stamping, stamping! Such a relaxing and fun day! I didn't actually create anything new, I just stamped several sets of Christmas cards left over from recent events.Iit was so much fun!

Today I want to share with you another card we made on Monday night. This card was originally a Founder's Circle swap, but somehow I lost the creator's name. If you know who, please let me know so I can give them credit!

Stampin_up_ornamental_mossy_pine_1 - Copy

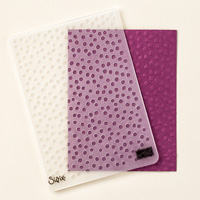
Ornamental Pine with Mossy Meadow & Whisper White cardstock and the On Point Textured Impressions Folder.

The MOST IMPORTANT TIP I gave my stampers for this card:  STAMP THE GREETING FIRST, THEN INSERT INTO THE EMBOSSING FOLDER!

Stampin_up_ornamental_mossy_pine_4 - Copy

Also, insert the card front into the folder with the "tree" triangles pointing toward the top of the layer:

Stampin_up_ornamental_mossy_pine_3 - Copy

The images in the Ornamental Pine set work well inside, outside, and on the envelope!

Stampin_up_ornamental_mossy_pine_2 - Copy

You can download the class handout by clicking on this link:  Download Ornamental Pine Mossy Pine

That's all for now. Tomorrow is a Liam day, so we will be playing with trains and not stamps, but that's o.k. with me! His daddy is in the R.N. Nursing program and this is his last week before Christmas Break, so I will only have Liam tomorrow and Friday, and then it will be the middle of January before I have him again. I intend to enjoy him the next couple of days while I can!

You can still order Ornamental Pine in my Online Store: www.carolpayne.stampinup.net

Big Shot

$99.95
Heat Tool

$29.95

Until tomorrow, have a Stampingrox! day! ©Stampin'Up!™1990-2014

Stampin’ Up! Banner Punch Sunflower!

Stampin’ Up! Banner Punch Sunflower!

Hey there! Punch & Technique Class was yesterday! I will be posting the projects we made on the 15th for Stampers Dozen Blog Hop. Today I'm sharing the binder cover club members made to reference their class instructions:

Stampin_up_punch_binder_1 - Copy

We used the Banner, 2 3/8" Scallop Circle, and 1 3/4" Scallop Circle punches to create the sunflower.

Starting with a Baked Brown Sugar base, we layered 2 Lullaby Designer Series Paper designs. A Decorative Dots-embosed strip of Baked Brown Sugar covered the seam.

We matted the pre-printed title with Coastal Cabana.

Stampin_up_punch_binder_2 - Copy

We sponged Baked Brown Sugar on the embossed scallop circles and Hello Honey on the Hello Honey banners, adhering them to the circles with SNAIL. We anchored them with Stampin' Dimensionals. Stampin_up_punch_binder_3 - Copy
Starting with 8" of Burlap Ribbon, we separated the threads. We looped three together, tied a knot at the end, then adhered to the flower  back with Glue Dots. We added three groups of Mossy Meadow  "leaves" before adhering with all those lovely dimensionals!

Stampin_up_punch_binder_4 - Copy

Only club members made the binder. I AM still taking new club members, so if you would like to join, contact me for full details. You can join even if you live long distance. I will ship you the class packets, including the binder cover, which are free with the minimum $25 order each month.

Here's the supply list to find everything in my Online Store:

All images ©Stampin'Up!™1990-2014

Stampin’ Up! Banner Punch Sunflower!

Stampin’ Up! Banner Punch Sunflower!

Hey there! Punch & Technique Class was yesterday! I will be posting the projects we made on the 15th for Stampers Dozen Blog Hop. Today I'm sharing the binder cover club members made to reference their class instructions:

Stampin_up_punch_binder_1 - Copy

We used the Banner, 2 3/8" Scallop Circle, and 1 3/4" Scallop Circle punches to create the sunflower.

Starting with a Baked Brown Sugar base, we layered 2 Lullaby Designer Series Paper designs. A Decorative Dots-embosed strip of Baked Brown Sugar covered the seam.

We matted the pre-printed title with Coastal Cabana.

Stampin_up_punch_binder_2 - Copy

We sponged Baked Brown Sugar on the embossed scallop circles and Hello Honey on the Hello Honey banners, adhering them to the circles with SNAIL. We anchored them with Stampin' Dimensionals. Stampin_up_punch_binder_3 - Copy
Starting with 8" of Burlap Ribbon, we separated the threads. We looped three together, tied a knot at the end, then adhered to the flower  back with Glue Dots. We added three groups of Mossy Meadow  "leaves" before adhering with all those lovely dimensionals!

Stampin_up_punch_binder_4 - Copy

Only club members made the binder. I AM still taking new club members, so if you would like to join, contact me for full details. You can join even if you live long distance. I will ship you the class packets, including the binder cover, which are free with the minimum $25 order each month.

Here's the supply list to find everything in my Online Store:

All images ©Stampin'Up!™1990-2014

Stampin’ Up! Work of Art Blackberry Bliss Blossom!

Stampin’ Up! Work of Art Blackberry Bliss Blossom!

Hey there! I had unexpected company today, Alisa, Cody & Oakley, and Kimberly, Tony, & Liam! They all came over to play in the baby pool (which they ALL fit in, BTW) and then afterward Alisa & Kimmy helped me with my convention swaps! They really helped boost me forward! Thanks, sweethearts!

Today I have another card we made last month at a Stamp-a-Stack with the Work of Art set:

Stampin_up_work_of_art_1
I had received a swap that was stamped with Hello Honey for the bloom and decided I wanted to try it with Blackberry Bliss. I LOVE IT!

This card is smaller than the normal A2 size we usually stamp. I used Whisper White Notecards and envelopes, layered on Mossy Meadow, then finished with another Whisper White layer to stamp. I used Hello Honey 3/8" Striped Satin Ribbon for the bow, and punched out the center greeting with the 1 3/4" Circle Punch.

Here's a tip to stamp the leaves on the stem. Ink up each end of the chevron stamp in the Work of Art set separately, then stamp with each end to create the leaves. Easy peasy!

Work of art flower stems

On the inside I used more Work of Art stamps to create the butterfly and the smaller  bloom at the bottom:

Stampin_up_work_of_art_2
I inked just a bit of the end of the flower stem stamp with a Mossy Meadow Stampin' Write Marker to stamp the body of the butterfly after I had stamped the wings with the heart from the set. I used the heart to stamp the smaller bloom too!

Work of art butterfly middle

It's SO EXCITING! Stampin' Up! is adding NEW items to the clearance rack today!

ClearanceRackBlitzLP_EN - Copy

Click HERE  to go to my Online Store to check it out! Up to 80% savings on lots of retired products, including items from the last Holiday Catalog!

Until tomorrow, have a Stampingrox! day!


All images ©Stampin' Up!™1990-2014

Stampin’ Up! Work of Art Blackberry Bliss Blossom!

Stampin’ Up! Work of Art Blackberry Bliss Blossom!

Hey there! I had unexpected company today, Alisa, Cody & Oakley, and Kimberly, Tony, & Liam! They all came over to play in the baby pool (which they ALL fit in, BTW) and then afterward Alisa & Kimmy helped me with my convention swaps! They really helped boost me forward! Thanks, sweethearts!

Today I have another card we made last month at a Stamp-a-Stack with the Work of Art set:

Stampin_up_work_of_art_1
I had received a swap that was stamped with Hello Honey for the bloom and decided I wanted to try it with Blackberry Bliss. I LOVE IT!

This card is smaller than the normal A2 size we usually stamp. I used Whisper White Notecards and envelopes, layered on Mossy Meadow, then finished with another Whisper White layer to stamp. I used Hello Honey 3/8" Striped Satin Ribbon for the bow, and punched out the center greeting with the 1 3/4" Circle Punch.

Here's a tip to stamp the leaves on the stem. Ink up each end of the chevron stamp in the Work of Art set separately, then stamp with each end to create the leaves. Easy peasy!

Work of art flower stems

On the inside I used more Work of Art stamps to create the butterfly and the smaller  bloom at the bottom:

Stampin_up_work_of_art_2
I inked just a bit of the end of the flower stem stamp with a Mossy Meadow Stampin' Write Marker to stamp the body of the butterfly after I had stamped the wings with the heart from the set. I used the heart to stamp the smaller bloom too!

Work of art butterfly middle

It's SO EXCITING! Stampin' Up! is adding NEW items to the clearance rack today!

ClearanceRackBlitzLP_EN - Copy

Click HERE  to go to my Online Store to check it out! Up to 80% savings on lots of retired products, including items from the last Holiday Catalog!

Until tomorrow, have a Stampingrox! day!


All images ©Stampin' Up!™1990-2014

Stampin’ Up! New Weekly Deals June 3-9!

Stampin’ Up! New Weekly Deals June 3-9!

Hey there! Just a quick post to give you the updated Weekly Deals!

10441174_10203289909682648_5984021444801531273_n

It's pretty neat that Stampin' Up! is continuing the Weekly Deals even after the new Catalog has started, isn't it?

I used the Gold Encore Metallic Pad to stamp the heart on this card a few days ago:
Stampin_up_work_of_art_mossy_meadow_1
It accented the Mossy Meadow heart and coordinated with the Gold Sequins perfectly!

Go to my website HERE to order.

Until tomorrow, have a Stampingrox! day!

©Stampin'Up!™1990-2014

Stampin’ Up! New Weekly Deals June 3-9!

Stampin’ Up! New Weekly Deals June 3-9!

Hey there! Just a quick post to give you the updated Weekly Deals!

10441174_10203289909682648_5984021444801531273_n

It's pretty neat that Stampin' Up! is continuing the Weekly Deals even after the new Catalog has started, isn't it?

I used the Gold Encore Metallic Pad to stamp the heart on this card a few days ago:
Stampin_up_work_of_art_mossy_meadow_1
It accented the Mossy Meadow heart and coordinated with the Gold Sequins perfectly!

Go to my website HERE to order.

Until tomorrow, have a Stampingrox! day!

©Stampin'Up!™1990-2014

Theme: Overlay by Kaira
Bonnie, Illinois, USA